Beaglebone AI Board Bringup
This document explains the steps to configure the Beaglebone AI board bring up and execute the Vesc Motro Control application.
Prerequisites
MicroSD Card (minimum 16 GB)
Ethernet Cable
FTDI cable for debugging
Beaglebone AI Fan cape
Micro HDMI to HDMI converter
Installing the latest image of Debian OS
Get the latest kernel image from the Beaglebone website. Install the Beaglebone AI Fan cape. The kernel version used for this application is provided here.
Insert the SD card to the host system.
Install a flashing software such as Balena Etcher.
Unzip the kernel image. The kernel image consists of .img extension.
Flash the kernel image on SD card.
Remove the SD card and mount it on the Beaglebone AI.
Connect the ethernet cable.
Connect the display monitor with Beaglebone using HDMI cable.
Plugin the power supply.
The connected monitor will prompt for username and password after a successfull boot:
username: debian password: temppwd
Debian OS Configuration
To use the maximum storage capacity of SD card the following commands needs to executed on the command line terminal
1sudo /opt/scripts/tools/grow_partition.sh
2sudo reboot
Install necessary packages :
1  sudo apt update
2  sudo apt upgrade
3  sudo apt-get install build-essential
4  sudo apt-get install binutils
5  sudo apt install openssh-server
6  sudo apt install git
7  sudo apt install device-tree-compiler
8  sudo apt-get install vim
9  sudo apt-get install screen
Update the show-pins utility script to determine pin configuration
1cd /usr/local/sbin
2sudo wget -N https://raw.githubusercontent.com/mvduin/bbb-pin-utils/bbai-experimental/show-pins
3sudo chmod a+x show-pins
4cd /opt/scripts/tools
5git pull
Installing RT-Linux on Beaglebone AI
Check the kernel version on the board - uname -a
sudo /opt/scripts/tools/update_kernel.sh –ti-rt-channel –lts-4_19
sudo reboot
After reboot the uname -a command must have “-rt” prefix attached to the kernel version

Enabling CAN and UART Interfaces
The CAN and UART interfaces are enabled on Beaglebone by modifying the device tree blob file. This is achieved by implementing the device tree overlays which reconfigures the pinmux settings of the respective pin headers. In order to compile these overlays Beaglebone provides a github repository that needs to be cloned. Below are the steps to enable CAN and UART interfaces:
git clone https://github.com/beagleboard/BeagleBoard-DeviceTrees.git
cd BeagleBoard-DeviceTrees
make all
The generated blob files can be copied in /lib/firmware folder
The entry in /boot/uEnv.txt needs to be updated accordingly.
The device tree blob files are already generated and stored on Gitlab Racecar. The downloaded blob files can be copied in the /lib/firmware folder and the uEnv.txt file needs to be updated. A sample content of uEnv.txt is shown here:
 1uname_r=4.19.94-ti-rt-r68
 2#uuid=
 3#dtb=
 4
 5###U-Boot Overlays###
 6###Documentation: http://elinux.org/Beagleboard:BeagleBoneBlack_Debian#U-Boot_Overlays
 7###Master Enable
 8enable_uboot_overlays=1
 9###
10###Overide capes with eeprom
11#uboot_overlay_addr0=<file0>.dtbo
12#uboot_overlay_addr1=<file1>.dtbo
13#uboot_overlay_addr2=<file2>.dtbo
14#uboot_overlay_addr3=<file3>.dtbo
15###
16###Additional custom capes
17uboot_overlay_addr4=/lib/firmware/BONE-UART4.dtbo
18uboot_overlay_addr5=/lib/firmware/BONE-CAN1.dtbo
After updating the uEnv.txt the board must be rebooted. The next step is to ensure that the interfaces are active. This can be verified by executing the show-pins utility script present in /usr/local/sbin folder.
1cd /usr/local/sbin
2sudo ./show-pins
The output pinmux settings for UART is shown below:

To enable CAN interface the CAN pins needs to be activated. This is done by executing the below commands:
1 sudo ip link set can0 up type can bitrate 500000
2 sudo ifconfig can0 up
3 sudo modprobe can
4 sudo modprobe can_raw
Executing the ifconfig command must show the network parameters of CAN interface.

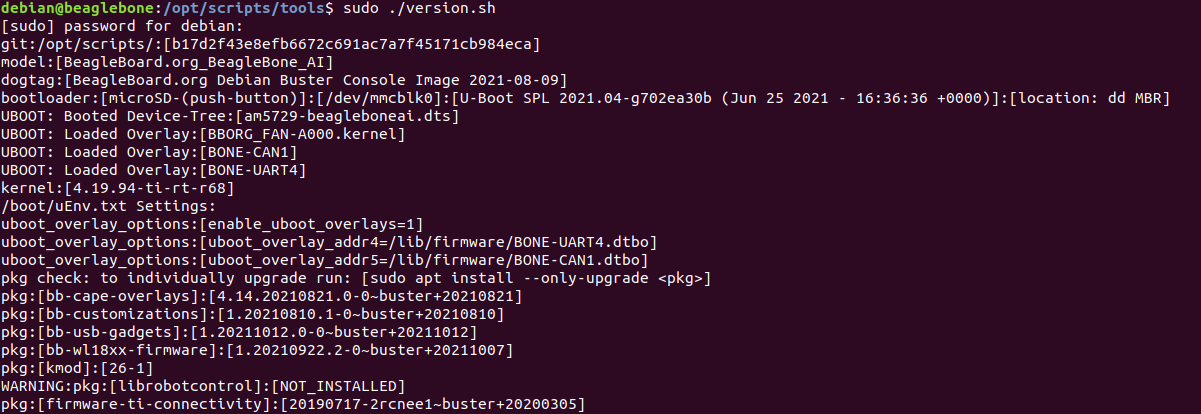
Executing sudo /opt/scripts/tools/version.sh show all the boot parameters.
Assigning static IP to Beaglebone AI
In order to connect the host machine to the BBAI without any dependency on the internet, static IP must be assigned to the Beaglebone. This ensures board access via Ethernet cable on the host machine. The following steps to enable static IP connection is valid for Ubuntu OS as the host machine.
Login to the Beaglebone AI either by using the FTDI cable or by connecting the micro HDMI cable, mouse and keyboard.
In order to assign the static IP user must have the root privileges, “sudo -i” command can be used to elevate to root privileges.
Follow the below steps to assign a static IP.
1  cd /etc/network
2  vi interfaces
Check if there is any existing entry for “eth0” interface. If there is any existing entry comment those changes and add the following lines in the file.
1  auto eth0
2  iface eth0 inet static
3      address 10.0.0.3/8
4      up route add 10.0.0.2 dev eth0
Reboot Beaglebone
Login again and check the IP address of “eth0” interface using ifconfig command. 10.0.0.3 must be the assigned IP address.
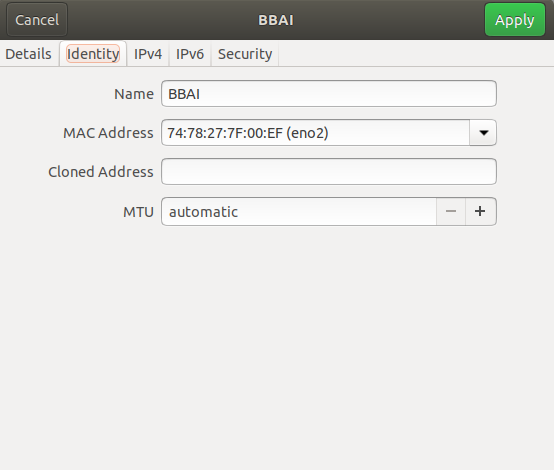
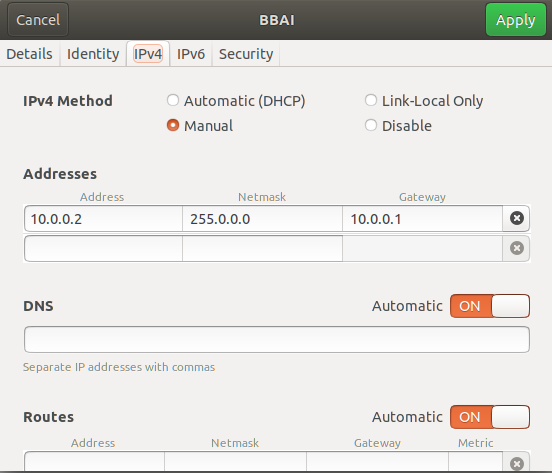
Now on the host UBuntu machine open the setting for the wired connnection and add a new Ethernet configuration. Update the settings as mentioned below The image shown below shows the MAC address specific to the machine. The MAC address needs to be updated accordingly.
Restart the host Ubuntu machine.
Now connect the device with the ethernet cable and select the configuration created for Beaglebone AI on the host machine.
Check the IP address of the ethernet interface - 10.0.0.2.
Execute the ping command - ping 10.0.0.3
If successfull, login to the Beaglebone using command debian@10.0.0.3. In case of failure restart the Beaglebone.